
In order to set up the UVPackmaster 2 engine with Blender follow one of the methods specified below.
Installer method (Windows only)
-
If you are upgrading from an older add-on version, go to Blender preferences and uninstall the previous version of the UVPackmaster add-on. After uninstalling, it strongly recommended to restart Blender, otherwise an error may occur when installing a new add-on version.
-
Download the latest version of the UVPackmaster add-on for Blender 2.8x – 3.x from the Downloads page (the add-on file name starts with uvpackmaster2-addon).
-
Install the add-on using the standard procedure for Blender add-ons.
-
Download the UVPackmaster 2 engine from your product library on the marketplace where you purchased it (Gumroad or Blender Market). Note that the engine is required to use the add-on packing features in Blender. Download the UVPackmaster engine installer – the name of the installer follows a pattern: uvp-engine-{EDITION}-{VERSION}.exe. Make sure you use the correct engine version – there must be a match between the add-on version and the engine version. You can use any engine edition, but it will determine a set of packing features which will be available.
-
After downloading, run the installer. Select a path where you want to install the engine. If you already have any other UVP engine installation present in your system (e.g. an older version or a different edition), the installer will automatically remove it before installing the new engine.
-
Install Visual Studio Redistributable 2017 for 64-bit systems from Microsoft, if you don’t have it installed already. It is required for the engine to run.
-
Run Blender (or restart if you had it opened). Go to the N panel of the UV editor – you will find the UVPackmaster tab there. At the top of the tab interface you should see that the path where you have installed the UVP engine was automatically detected by the add-on. You can immediately start using UVP packing features in Blender.

General method (applicable to all systems)
If you are upgrading from an older add-on version, go to Blender preferences and uninstall the previous version of the UVPackmaster add-on. After uninstalling it is strongly recommended to restart Blender, otherwise an error may occur when installing a new add-on version.
Download the latest version of the UVPackmaster add-on for Blender 2.8x – 2.9x from the Downloads page (the add-on file name starts with uvpackmaster2-addon).
Install the add-on using the standard procedure for Blender add-ons.
Download the UVPackmaster 2 engine from your product library on the marketplace where you purchased it (Gumroad or Blender Market). Note that the engine is required to use the add-on packing features in Blender. Download the UVP engine package – the name of the package follows a pattern: uvp-engine-{EDITION}-{VERSION}.zip. Make sure you use the correct engine version. You can use any engine edition, but it will determine a set of packing features which will be available.
Extract the engine package at any location convenient for you.
In Blender go to the N panel of the UV editor – you will find the UVPackmaster tab there. At the top of the UVPackmaster tab press the Select UVP Engine button (a small button next to the engine path field). A file browser will pop up.
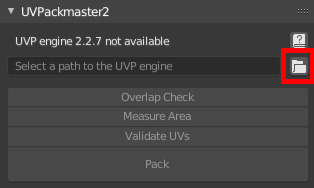
In the file browser, navigate to the path where you extracted the engine package and localize a file named release-{VERSION}.uvpini – select the file in the browser. CAUTION: do NOT go to any OS-specific subfolder – you must select the uvpini file which is located in the main folder of the extracted engine package.
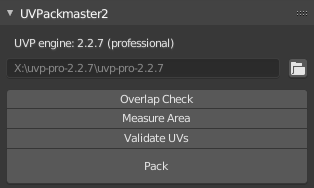
The engine will be automatically initialized and you can immediately start using UVP packing features in Blender.
In order to make sure the new engine path will be preserved after Blender is closed, go to the Blender Preferences window and click Save Preferences.
If you experience any issues with the procedure contact us at support@uvpackmaster.com.
Set up UVP on a removable drive
Problem: I want to keep my Blender installation as well as the UVP engine package on a removable drive. The problem is the path to the UVP engine changes depending on the system I plug the drive in. Can I avoid setting the path to the engine every time I run Blender on a different computer?
Yes, starting from version 2.3.1 of the UVPackmaster add-on you can solve this problem. You just need to extract the UVP engine package directly in the directory where the add-on was installed. This works because the add-on always checks its installation path when looking for the UVP engine as the option of last resort. Follow the steps below:
Install the UVPackmaster add-on with Blender on your removable drive (note this procedure works only with the add-on version 2.3.1 or later).
Navigate to the path on your removable drive where the add-on was installed. The installation path depends on your Blender configuration, it will probably end with a directory hierarchy such as: …/scripts/addons/uvpackmaster2 (in this directory you will find add-on Python files).
Extract a UVP engine package in the add-on directory and rename the engine subdirectory after extraction to uvp. As a result, the engine uvpini file should be placed at the destination: …/scripts/addons/uvpackmaster2/uvp/release-{VERSION}.uvpini.
Run Blender installed on your removable drive and go to the UVPackmaster interface in the UV editor – you should see that the engine was automatically detected, without a need for manual path selection. It will be detected every time you run Blender, no matter what letter was assinged to the drive.
Warning: keep in mind that in the case of the add-on being installed on a removable drive, the engine package will be removed from the drive when you uninstall the add-on in Blender.